You’re excited to get into the world of forgotten vintage analogue cameras but how do you find the perfect camera? In this guide we’ll run through everything you need to know to avoid disappointment.
You can find reviews of some of my finds in the expanding Analogue Camera Reviews section.
Note: This guide is mainly concerning purely mechanical (~pre-1975) cameras. To find our why have a read of our site origin story. Any camera with batteries automated film wind, autofocus, flash or even digital sensors will have their own unique set of challenges not discussed here.
Before You Start: Decide What You Want a Camera For (and have a Plan B)
Are you buying a camera to display, upcycle or use? What you decide influences which of these tips are relevant to you.
If you want a camera for display, ignore the rest of this page…choose something that appeals to you. In this case damage can be considered patina, non-functionality can make you feel better about relegating a camera to life on a shelf value becomes less about the market and more about personal value for something that will become an object you see in your home everyday.
For upcycling it depends on the project but most cameras can find some secondary use, simply visualise your creation and check the camera has the right proportions, features and look for your plans. Common ideas are clocks (check the lens mount size), lamps (where will the holes for wires be) and bookends. I’ve shared some inspiration from my own projects here.
Finally if you hope to use your newly found piece of history, read on and we’ll guide you through the process….


Types of Camera
There are a few very different types of camera, each with a very different aesthetic for display, shape for upcycling and function/experience for use. These are the one’s you’ll typically be deciding between for your mechanical photography adventure…
- Box Cameras: As simple as they come, mostly taking roll film (hopefully 120) they look like….well a box, with little more than a tiny lens opening on the front and a latch to open the back. Here you will often find image “quality” just above above a toy camera with a few exceptions and limited shutter speed and aperture options, sometimes even no options, just fixed setting suitable for a sunny day with low ISO film. Viewfinders are typically simple and tiny mirrors in the edges…small and difficult to see.
- TLR Cameras: Easy to identify by the box shape but with 2 serious looking lenses on the front. Again these are typically roll film. Here you will find a huge variety of quality from the lowest end similar to a box camera right up to the best lenses of the day. The top will open up to present a very large window, look down into the top of the camera to compose and focus. This is slow photography at it’s finest.
- Viewfinder and Rangefinder Cameras: A much more familiar setup to the modern photographer. A typical “camera shape” with a viewfinder at the top and a single lens on the front. These come in 35mm format (often with a film advance lever) and 120 format (often with a knob on the top plate to advance the film). With a rangefinder you can focus easily by lining up a split image through either the single main viewfinder or sometimes a second one (there are always at least 2 windows on the front of the camera). Composing is accurate at longer distances but further “off” the closer you get as the viewfinder is above the lens. With a standard viewfinder camera you guess the distance, set the aperture narrow enough for depth of field and hope for the best. On a sunny day you can use f11 or f16 which is more than enough to cover errors in the distance.
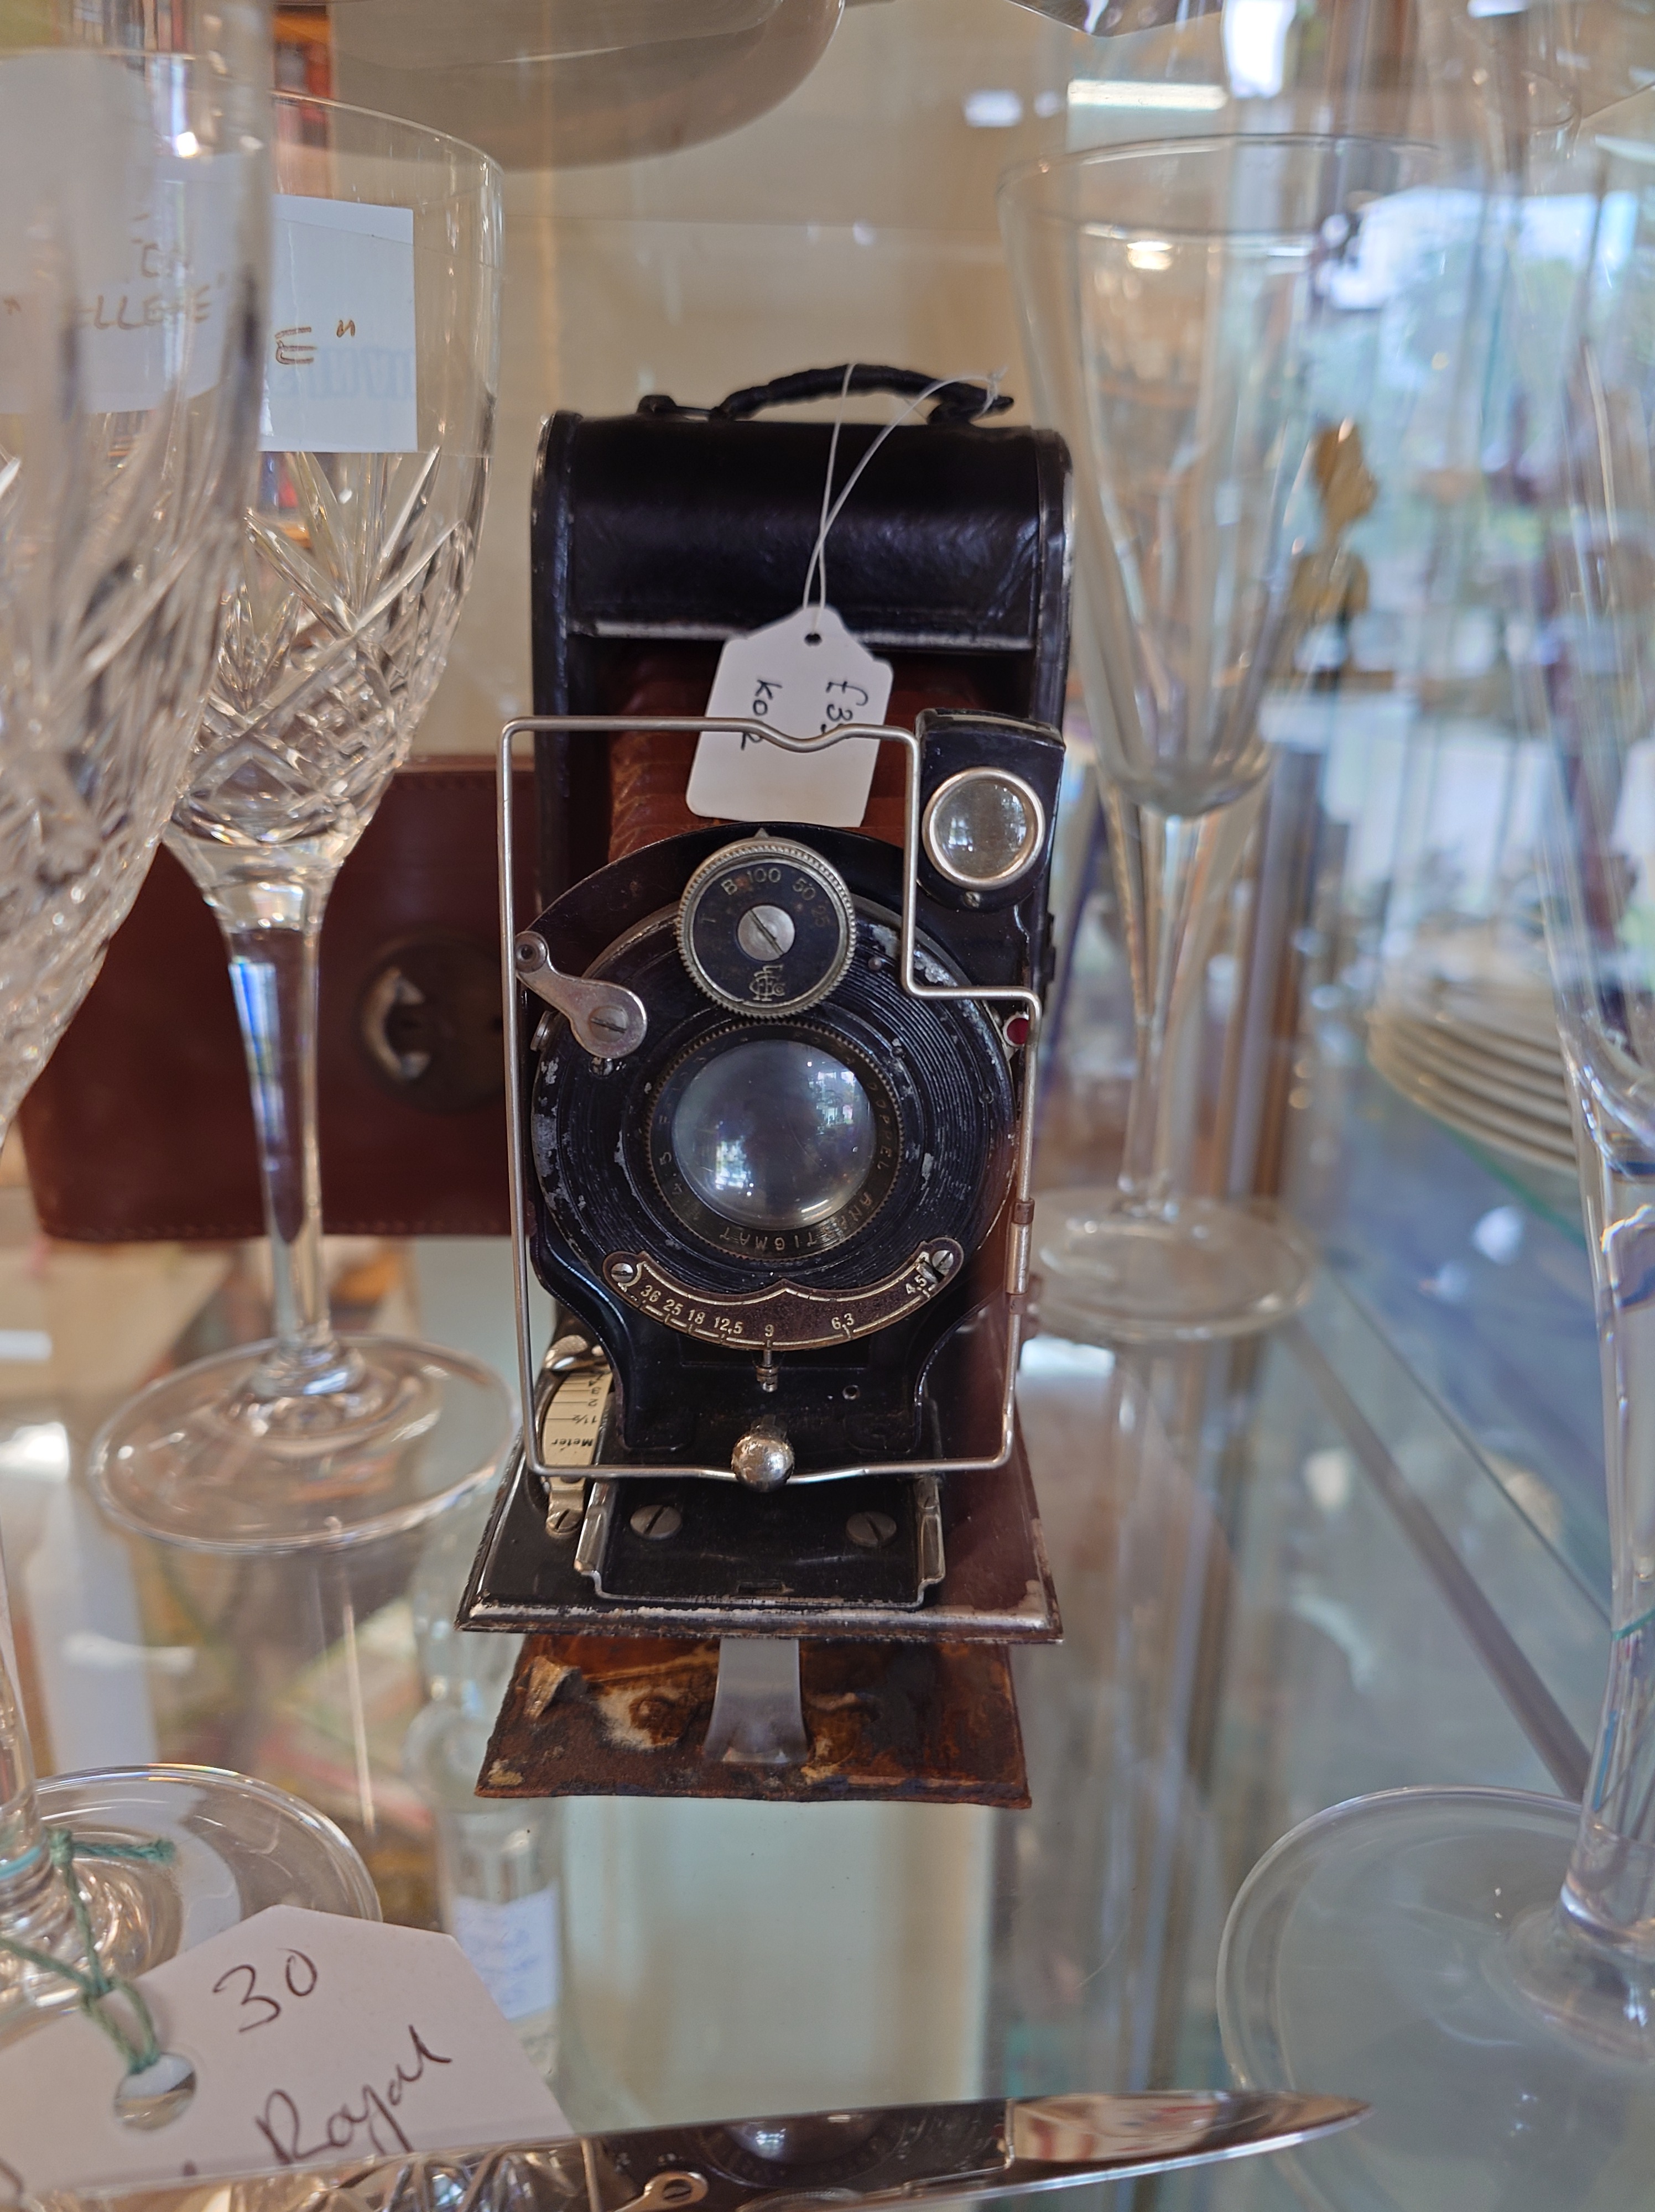
- Folding/Bellows Cameras: The classic display piece but don’t be put off, these are still working cameras often of incredible quality. Mostly roll film, the shooting experience is similar to viewfinder cameras except the “viewfinder” could be anything from a metal window on the top plate to a tiny mirrored viewfinder by the lens, a metal frame that pulls out to the side to align or even a proper rangefinder. An element of guesswork, a lot of fun. Classic in every way.
- SLR Cameras: Almost all 35mm and just like the modern day versions, what you compose in the viewfinder is what you get. Flexible, accurate and powerful.
There are other types less commonly found.


Buying Cameras (& Lenses) in A Shop
Whether it’s a charity shop, a car boot sale, or an antique shop there’s no feeling quite like discovering a dusty gem in person.
Tip 1: Specialist dealers vs house clearances and donations
When browsing an antique emporium, a charity shop or a car boot sale there’s generally 2 kinds of place you’ll find a camera or lens.
The first kind is with specialised sellers where there’s many curated cameras all sold together….think a large Oxfam or an antiques dealer specialising in photography equipment. There are many advantages to buying here, in general (but not always) the specialised seller will know what they’re looking at. Cameras will be as described, and within +/- 20% of market value. I don’t want to discourage anyone from buying from these sellers, quite the opposite….any independent business supporting photography should be supported however for me the fun comes in the unexpected…
In smaller charity and antique shops across the UK there are many family donations and dealers who source from house clearances. They have a lot of stock of all different kinds and they want to flip it quickly. Here is a treasure trove waiting to be explored. You may find a camera hiding under a dinnerware set or propping up some books. This is true untested territory and where the fun of the find really begins. As long as its cheap enough you’re willing to roll the dice some real bargains can be had. I’ve had excellent luck with very few broken cameras but it’s always good to assume the worst and be pleasantly surprised.


Tip 2: Checking Cameras Before You Buy
So you’ve found that special camera hiding in the cabinet, congratulations! Pausing just briefly, it’s always worth making sure the camera you’re buying is what you expect. Of course if your plan is display or upcycling rush right over the the counter, otherwise if you want to get some beautiful photos from your new discovery read on…
- Check For Old Film: If your camera has exposed film in it the easiest way to not ruin it is to test the rewind knob on 35mm film cameras, generally on the top plate with an arrow to indicate the direction to turn. if it turns freely with no resistance there is no film inside. If it resists do not force it, there is film inside and often a button on the base plate to release the rewind mechanism.
- Opening The Camera: If the camera is folding open it up, typically this is a button on the top plate. Confirm it opens smoothly. Some bellows cameras have a secondary step to gently pull the lens and bellows forward once the door is opened, others carry the lens all in one motion. To release the back there is normally a catch on the side or you pull up on the rewind knob. On some cameras the bottom comes off too, in this case you will typically find one or two latches to turn on the base plate.
- Closing the Camera: For folding cameras closing the camera again can be frustrating as every mechanism is different. Typically there are 2 silver angled metal pieces linking the open door and the body which must be pushed forward, back or inwards to release the door for closing. Some cameras have a button or similar. It shouldn’t require much force. On almost all cameras closing the back is straightforward, simply push closed in the opposite motion as opening and ensure the latches are closed.
- Shutter: To test the shutter on a film camera without film there are a few approaches….
- Folding cameras and TLRs will often have a lens mounted shutter. In most cases there are a number of levers around the lens for aperture (single and double digit numbers), setting shutter speed (single to triple digit numbers), tensioning the shutter (no numbers, a simple lever) and on the oldest cameras to release the shutter too. Set a speed, gently pull the shutter tensioning lever, do not force it, then trigger the shutter either with a button on the camera or a lever near the lens. Tip: Some 120 cameras have a double exposure prevention system which requires film to release the shutter button on the body. In this case you can often see the linkage between the shutter button and a recessed lever near the lens. Trigger it manually by catching that lever with your finger.
- 35mm cameras are simpler. Shutter speed is set with a dial either around the lens or on the top plate, pull the film advance lever and release the shutter. Tip: If nothing happens don’t fear, there are some cameras which require film loaded to tension the shutter, consider trying some test film.
- Box cameras are simpler still, many have limited or even fixed speeds triggered by flicking a small metal switch on the side.
- Regardless of the camera, always test all different speeds. Many cameras are OK at faster speeds as they age slower speeds (<1/30s) can be hesitant or stick. These may still make perfectly usable daylight cameras with some high speed film for the right price. If you don’t plan to do 1s exposure on a tripod and it’s cheap it might still be worth a try for fun.
- Watch the shutter, either with the lens off or back open. Over time you get a feel for the timing and if it’s unscientifically “about right”. If it seems hesitant or sticks it needs an expensive service.
- For any camera offering more than a couple of shutter speeds there are 2 basic kinds of shutter…focal plane shutters with metal or cloth that sits flat across near the film and leaf shutters which are delicate blades in a circle, generally mounted in or near the lens. In general SLRs and Rangefinder use focal plane shutters and most compact viewfinder cameras use leaf shutters. In the case of cloth focal plane shutters these can often warp or develop holes which can be hard to see so keep this in mind, even if they move correctly you won’t know for sure until your film comes back from the lab. Metal focal plane shutters and leaf shutters are far more reliable without care in my experience.
- All shutters are like delicate clockwork. Never force them.
- Light Seals: Open the back, is there any felt-like material on either the body or the door where it joins? Many older compacts didn’t have this however newer cameras and SLRs in particular made heavy use of soft light seals which degrade over time. If it seems brittle or flat it likely needs replacing, run your finger over it and see if any comes off…another sign a replacement is overdue. The good news is this is relatively straightforward to do at home, requiring a steady hand and some patience. Buy some new material (either pre-cut for you camera model or a sheet to cut yourself matching the old), fully remove the old with some isopropyl alcohol and apply the new. If you’re less confident your local camera repair shop should be able to help.
- Light Meter: I don’t worry about lightmeters, my phone has an app and I can buy an external meter if I really want. The camera works perfectly without as long as I get the settings right. That said there are generally 2 types of light-meter.
- “Newer” SLRs often use battery powered meters (often CdS), hard to see from the outside of the camera body but with the tell-tale sign of an indicator in the viewfinder and (typically on the bottom plate) a small round cover for the battery. Hard to test without a battery to hand, always check for the exact replacement you need including voltage as modern alternatives are often different causing an incorrect reading.
- Older cameras often have selenium light meters, easy to see due to a large rectangular “window” on the front of the camera and no battery in sight. Selenium meters have a finite lifespan so if the camera hasn’t been away from light it’s likely no longer functional. This is not repairable so if this matters to you always check. Find the dial/indicator, either on the top plate or in the viewfinder and see how reactive it is. Point the camera at a bright light then observe the meter as you cover it with your hand and release, it should jump up and down.
- More rare are extinction meters which have a lot less to break but are not as accurate. These simply have a series of numbers and you read off the highest/lowest value that’s visible in the finder.
- Viewfinder: Simply check it’s clean and clear. In the case of TLRs and SLRs the mirror can be in poor condition resulting in a dim image or visible marks/dust. This won’t affect your image but is a usability drawback.
- Battery: If the camera does have any battery check it has not decayed. If it has it may clean up, but eaually it may not so be cautious.
- Camera Body: Check the cosmetic condition for paint chips, scratches or dents. For the most part this has no impact on usability but be careful of any significant damage, particularly dents which may have done internal damage.
- Rangefinder: Rangefinders are easily identifiable by the split image in the viewfinder and 2 windows on the front of the camera. Look through the viewfinder and turn the focus. The split image should always be aligned vertically. Once aligned horizontally the focus should show the correct distance for the object.
- Lens: Check all the steps for a standalone lens in Tip 4

Tip 3: The Overlooked Glass
For non-photographers out there it’s all too easy to assume a camera is a camera, but we know glass can be far more important to the photograph (and far more expensive) than the camera the lens is mounted to.
Take a cheap Pentax or Praktica M42 mount SLR for example; The lowest end bodies can be worth as little as £5 however the lens is overlooked. There are many M42 mount lenses worth £100s which may be mounted on the camera.
Equally there are plenty of cameras with fixed lenses that came with different lens options from the factory. Take a pre-war Welta Weltini Rangefinder (incidentally one of my favourite forgotten cameras…article coming soon), the price difference between a Xenar or Tessar lens version and a Xenon is significant. The jump to the (very rare) Letiz Elmar is huge. When assessing a camera always check the camera make, model AND lens.
Some great resources I use are:
- Camera Wiki: https://camera-wiki.org/
- Camerapedia: https://camerapedia.fandom.com/
- CollectiBlend: https://collectiblend.com/Cameras/
- The LensDB: https://thelensdb.com/
If you don’t have time (or signal!) to Google as a rule of thumb for the first half of the 20th century anything faster than f/2.8 is an exceptional lens and most likely high end. Having said that many slow triplets (3 glass elements) which were lower end lenses at the time are today prized for their character. And remember, if you wanted technical perfection you’d pick up your digital camera, analogue is all about the character, the perfect imperfections.
During this earlier time period a few manufacturers were at the forefront of quality and are good brands to see printed on the front of that beautiful glass…
- Zeiss (AKA Jena, Oberkochen, aus Jena, Jenoptik due to cold war trademark disputes)
- Voigtländer
- Schneider
- Rodenstock
- Meyer-optik Gorlitz
- Leitz (now Leica)
- Angenieux
- Kinoptik
As the Japanese Optical industry began to equal and the surpass Germanys (c. 1950s) many familiar names began including…
- Nippon Kogaku (later Nikon/Nikkor)
- Asahi (later Pentax/Takumar)
- Serenar (later Canon)
- Minolta (Rokkor)
Many other Japanese company’s (often of equal quality) sold their lenses under many licensed brand names in the west. If you find a lens brand with almost no information on the internet about it chances are it’s one of these arrangements. The lens may be of excellent quality or poor, it’s very hard to tell without a test or reviews on the internet.
Similarly many Pentacon branded lenses are in fact designs from one of the premium German brands listed above as part of the same consortium (VEB) in East Germany.
Badge engineering as it would be called in the automotive world was extremely common in the photography industry.
Note, these are very much non-comprehensive lists

Tip 4: Checking Lenses Before You Buy
- Glass: A lens is only as good as it’s glass, the most important thing of all here is that it is free of fungus, significant haze or scratches. Shine a torch, or phone light, through the lens from both ends (if possible).
- Inspect the edges for fungus which often presents as a spiders web effect. It can be easily confused with dust so take care.
- Haze will show up as a milky effect to the glass. Light haze is OK, and often found on old lenses as the lubricants evaporate over decades but significant haze can hurt image quality and value requiring professional cleaning.
- Dust is to be expected in an old lens and light dust shouldn’t affect image quality.
- Scratches depend on the severity. Old glass formulas are softer than used in modern lenses and, particularly with uncoated glass, even the most careful cleaning can leave faint surface scratches. This shouldn’t affect image quality and isn’t unusual. Be wary of deeper scratches or scuffs to the surface.
- Lens Body: Check the cosmetic condition for paint chips, scratches or dents. For the most part this has no impact on a lens you intend to use but be careful of any significant damage, particularly dents. If the lens has been dropped it’s possible internal damage was done or things were knocked out of alignment. With old lenses the optical quality can be as much dependent on the condition of your example as the lens design that left the factory.
- Focus/Zoom: Use both through their full range. They should turn smoothly. If they require force the lubricants may be drying up (common with Agfa lubricants for example) and will eventually seize rendering the lens unusable without a strip down service. Also watch for any “gritty” feeling as any debris jammed in the delicate internal parts may quickly start to do damage.
- Aperture: If the lens has an aperture control turn it. It should be smooth and responsive. Any delay between input and the aperture blades opening & closing inside the lens could suggest failing lubricant. Close the aperture fully (highest “f” number), look into the lens again with a torch and observe the aperture blades. Can you seen any oil residue? This may be fine with some use but again indicates aging oils. If it has an “auto-aperture” switch (later M42 lenses for example) test this. In the M42 example depressing a small pin in the rear of the lens should trigger the aperture to go to the set value in “auto” mode.
- Mount: If the lens is not on a camera double check the mount fits a camera you own, want to buy, or has an available adapter if you plan to use it on your modern mirrorless digital camera. There are many mounts out there, some screw and bayonet mounts look very similar, so be careful it is what you think it is.
- Autofocus: Given our theme of mechanical, early-mid 20th century, cameras we assume manual focus lenses, autofocus is harder to test without a powered-up compatible camera and a risk worth considering.


Tip 5: Check The Accessories
Some cameras come equipped with accessories:
- Ever Ready Case (ERC): I personally love to have these. More often than not they are brown leather (or leather effect) and look very much alike. The don’t add a lot of value but in my opinion complete the camera and add functionality.
- Lens Hoods: Often in a pouch on the ERC strap. Useful to have but rarely add value.
- Accessory Rangefinders: Often in a pouch on the ERC strap. Extremely useful if properly calibrated. Look through the eyepiece and turn the dial until the images align. The split image should always be aligned vertically. Once aligned horizontally the dial (or seen in eyepiece) should show the correct distance for the object. Some of these (such as a high end Watameter) can be worth much more than the everyday viewfinder camera it’s attached to.
- Accessory flash: Often of little value these days, but can look cool for a period-correct display item of upcycling project.


Tip 6: Brands & Rarity Don’t Always Drive Value
Many people associate brands with value. Zeiss, Voigtländer, Agfa….these are famous names synonymous with quality and some sellers associate that quality with value. Unfortunately, with one very notable exception (looking at you Leica…), this isn’t always the case. The value of a camera can be driven much more by the lens, condition, rarity and appearance than brand prestige. There are cameras out there worth £1000s with brands you’ve never heard of and cameras from the likes of Zeiss which are truly amazing quality which are virtually worthless in the current market. Always look beyond the badge.


Tip 7: The Different Meanings of Labels
Just a price: Treat this as “untested”, only pay what you’re willing to lose if your sole aim is a working camera.
Untested/Sold As Seen: No insight to be had from the seller here, rely on your own checks. This is 95% of the cheaper cameras out there.
Spares Repairs: Confirmed not working but don’t let this but you off straight away, it could be a chance for a bargain. Ask the seller what the issues are, it could be as simple as a dead lightmeter you weren’t going to use anyway or some degraded light-seals which are easy and cheap to replace.
Tested/Working: Still do your own checks, as we discussed above a shutter that fires doesn’t mean it’s accurate. A functional film wind doesn’t mean the film chamber is light tight.
CLA’s/Serviced: Means the camera has been serviced and should be in perfect working order. Always check this though…where and when was the CLA done, was it a reputable place, was it recent, is there a paper trail. Expect to pay a significant premium.


Tip 8: Check the Film Format
If you want to use your newly found bargain you need to put some film in it, this means, unless you’re confident enough with rolling the dice on expired film, you need your camera to take a standard that Kodak, Fujifilm, Ilford or anyone else still manufacturers.
120 Medium Format: https://camera-wiki.org/wiki/120_film
120 roll film is the longest surviving format of all any camera from the 20th century could take this film. 120 resembles a roll of paper on a plastic (in modern times) spool which is loaded in the camera back. Beware there are other formats such as 620 (similar with a slightly different spool) and 127 (a smaller roll film format) which are no longer in production. Once you’ve used 120 film a lot you get used to identify the size and shape of the spool. Other ways to tell include:
- Open the back, is there an empty spool in there? 120 involves the film moving from one roll to another so it’s common for an empty spool to remain in the camera. Take it out and look at the ends…you might just see an embossed note such as “Kodak 120” confirming the format.
- Check the inside of the camera and case for a label. Many old camera manufacturers also made film and would advertise their own stocks. You may see a sticker which gives away the format such as “Use Agfa 120 Film”.
- Take an old 120 spool (or new roll) with you and test fit it in the camera. If you do choose to take an undeveloped roll I would suggest buying the cheapest one possible for this purpose. 120 film isn’t as perfectly lightproof as 135 (35mm cartridges) and should be loaded/unloaded in subdued light if you plan to use the film.
135 “35mm” Format: https://camera-wiki.org/wiki/35mm_film
If 120 is the the longest surviving format, 135 is perhaps the most successful. This is the cartridges we’re all familiar with. For a non-folding camera, the strong likelihood is it takes 135 film however there are other small formats which came and went over the years such as Agfa’s Karat/Rapid system (which involved 2 cartridges) or the much newer APS system neither of which is still in production
In this case I do recommend taking any old 35mm film out with you and test fitting as the easiest approach to confirmation.
Other Formats: https://camera-wiki.org/wiki/Film_sizes_and_designations
As you can see in the above link, there have been a huge number of alternative formats over the years, some such as 127 enjoyed modest success while others are extremely rare these days. There’s also large format/plate cameras to consider, some standards for which are still available.
If you find a camera which takes one of these alternative formats there are still options available…
- Modification: Search the internet and you’ll find all sorts of DIY approaches to adapting one standard to another, sometimes on a camera by camera basis. For example a 620 spool is very close to a 120 standard. It’s at your own risk but can be a fun little project.
- Specialist Film Suppliers: Some companies do sell dead formats of film, often making a business “re-spooling” modern stocks (e.g. cutting 120 down to 127). Not cheap but a good approach for success if you can find the right film.
- Alternative uses: Maybe now is the time for your “plan B”…would the camera make a good display item or is that upcycling project calling.
Buying Cameras (& Lenses) Online
For that special camera you’ve seen and want to find or that rare final piece to a collection sometimes there’ no substitute for the global market that’s available online. Here you have 2 options
Option 1: The Trustworthy Specialists
The ideal is to buy from reputable store, either an ebay store with 100s or 1000s of positive reviews or the website of a reputable camera retailer. This ensures you can trust the description, ask questions and know what you order is what will turn up at your door.
Don’t always assume this is the expensive route either, while these stores will know exactly what the market value is often their business model is based on volume and turnover, with cameras priced to sell quickly. You won’t get the bargain of the century, but you might just get a good deal on a special camera.
Option 2: The Hunt For Bargains
The riskiest of everything we’ve discussed. There are genuine bargains to be had from private sellers on ebay selling “vintage camera untested” however all too often things are not as they seem. If it seems too good to be true it generally is. If someone has taken the time to photograph and list an individual item, they have had time to type the brand and model printed on the camera into Google. If it’s under-priced it can be because they want a quick sale, but all too often it’s simply reflective of the condition. Buyer beware.
Tip: Check ebay sold prices in the advanced search (https://www.ebay.co.uk/sch/ebayadvsearch). Just because there’s only one or two of a rare item available and the asking price is high does not make that the market value. Often sellers see they have a unique item so chance a high asking price, other sellers sometimes set their prices to that even though no buyer is actually paying that. Remember, a seller can ask anything they like, the important thing is the price buyers have actually paid.
On the flip side there are genuine bargains to be had if you’re careful, in my experience in one of 3 circumstances…
- Average Cameras with Special Lenses: As we discussed before glass makes the photo and lenses are frequently worth more than their camera. Some sellers only look up the value of the camera, not the specific version with the special lens or (if interchangeable) the lens that happens to have been left attached.
- Hidden Accessories: Some cameras come equipped with accessories, for example check any Ever Ready Leather case for pouches attached to the strap. If one of those is, for example, a high end accessory rangefinder (such as a Watameter) it may be worth much more than the everyday viewfinder camera it’s attached to.
- The Job Lot: In rare cases, much like our antique dealer write up, someone is selling a lot of a bunch of items with a special camera mixed in. In this case it is plausible they haven’t taken the time to research every single item.
Leave a Reply